Quick Start
1. Replace Domain
Goto config.mts file, change 'sitemap' & 'socialLinks' parts to your own domains.
{
    sitemap: {
        hostname: "https://docs.code2life.top",
        hostname: "https://docs.awesome.com",
    },

    socialLinks: [
        {
            icon: "github",
            link: "https://github.com/code2life/vitepress-diataxis-template",
            link: "https://github.com/your-org/your-project",
        },
    ]
}2. Setup Giscus Comments
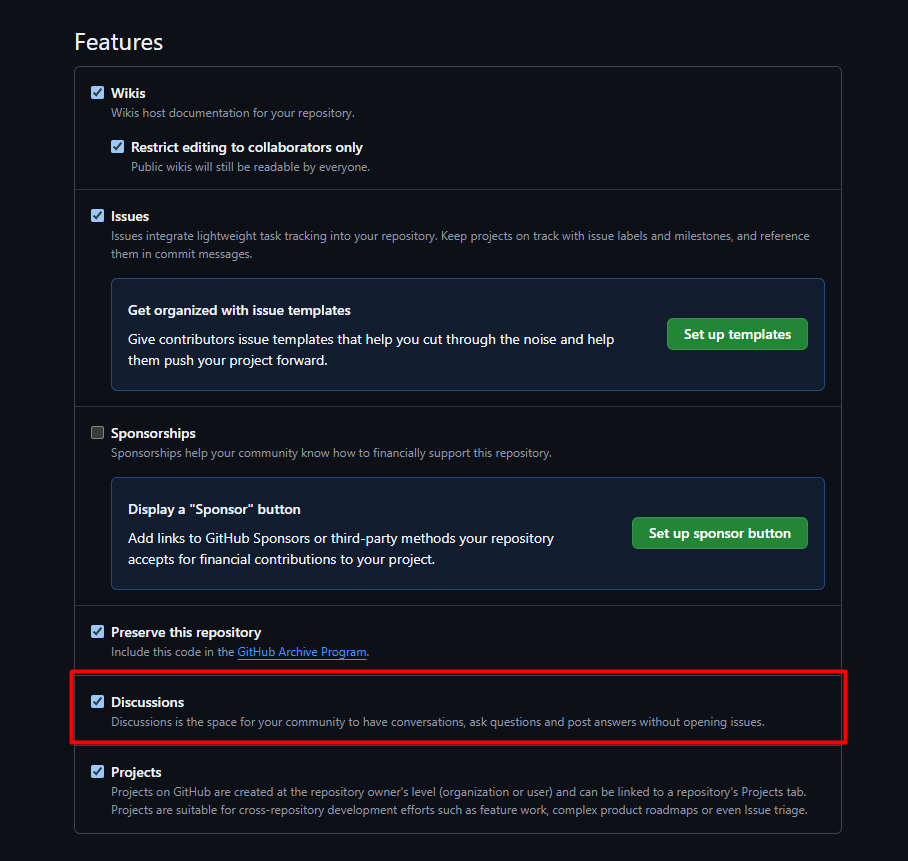
Install Giscus App to your public doc repo
Enable discussion feature for the repo

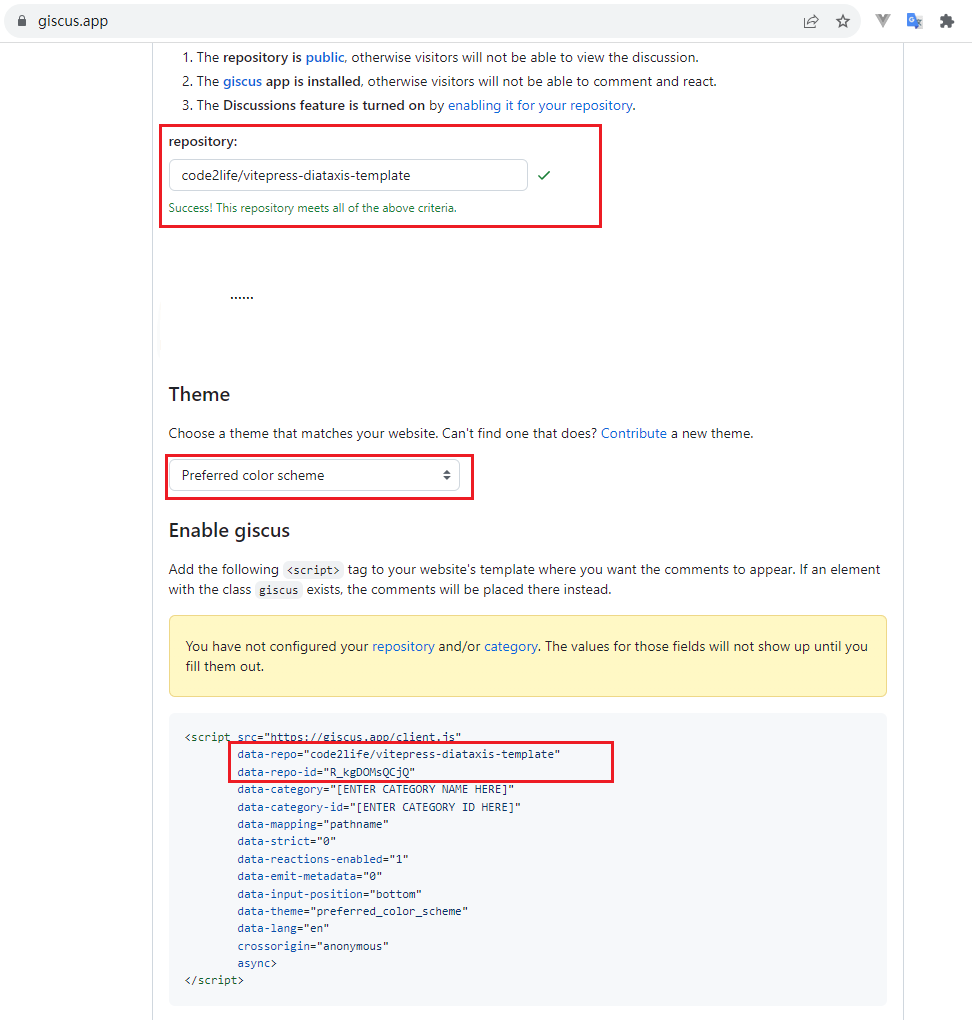
- Replace data-repo and data-repo, data-repo-id, data-category, data-category-id in docs/.vitepress/theme/components/VComments.vue, find the snippets here: https://giscus.app/

// docs/.vitepress/theme/components/VComment.vue
<ClientOnly>
  <component :is="'script'" src="https://giscus.app/client.js"
    data-repo="code2life/vitepress-diataxis-template"
    data-repo-id="R_kgDOMsQCjQ"
    data-category="General"
    data-category-id="DIC_kwDOMsQCjc4CisoM"
    data-repo="replace-me"
    data-repo-id="replace-me"
    data-category="General"
    data-category-id="replace-me"
    data-mapping="pathname" data-strict="0"
    :data-theme="isDark ? 'dark' : 'light'"
    data-reactions-enabled="1" data-emit-metadata="0"
    crossorigin="anonymous"
    data-input-position="top" data-lang="en"  data-loading="lazy" async />
</ClientOnly>3. Setup Translate
Most auto translation does not work well, you can use Cursor to translate markdown files. This repo has a built-in Prompt file for Cursor, you can start using it in 3 steps.
- Select a file or section, click Command+K or Command+L to open the Cursor chat
- Input @translate-revise, and click Enter
- Cursor will auto translate the selected text, and you can review and save it
4. Setup Google and PostHog Analysis
- Register a Google Analytics account and get the measurement ID (G-XXXXXXXXXX)
- Add the measurement ID to docs/.vitepress/config.mts head part:
head: [
    ["script", { src: "https://www.googletagmanager.com/gtag/js?id=G-XXXXXXXXXX" }],
    ["script", {}, `window.dataLayer = window.dataLayer || []; function gtag(){dataLayer.push(arguments);} gtag('js', new Date()); gtag('config', 'G-XXXXXXXXXX');`],
],Remember to update the public/robots.txt to match your own hostname.
PostHog is an amazing SaaS product that covers almost all customer behavior analysis requirements.
Goto PostHog, register account and follow the setup steps, then copy the code snippets to replace docs/.vitepress/config.mts head part.
head: [
    ["meta", { name: "color-scheme", content: "dark" }],
    ...
    [
        "script",
        {},
        // copy your own script from PostHog onboarding page
        `!function(t,e){var o,n,p,r;e.__SV||(window.posthog=...{api_host:'https://us.i.posthog.com'...`,
    ],
],5. Setup Sandpack Code Sandbox
Sandpack is a great tool for adding interactive tutorials on documents, especially for frontend tech stack, it's out-of-box for this template site, see
See example page and check vitepress-plugin-sandpack doc for more details.
6. Add Auto-generated API Docs
This template integrates with Stoplightio Elements for auto generating API docs based on OpenAPI schema, using separate page without any layout is recommended.
Use the WebComponent with just one line of doc, see this demo.
---
layout: false
---

<ClientOnly>
    <elements-api apiDescriptionUrl="https://api.apis.guru/v2/specs/github.com/1.1.4/openapi.yaml" router="hash" layout="sidebar"></elements-api>
</ClientOnly>If you need to customize API doc page, check the Stoplight Elements Options.
7. Customization
Read VitePress official docs to find customization ways, here are some common customization entrypoints.
- docs/.vitepress/sidebar.mts is for changing the menu of guide/reference, remember to update it upon new markdown added.
- docs/.vitepress/en.mts and docs/.vitepress/zh.mts are the entrypoints to configure whole page menus and links, go through and change on-demand
- You can change the default layout by editing docs/.vitepress/theme/index.ts
- You can custom other layouts by adding new components and use it in front-formatter
Known Issues
- Mermaid pie chart, ZenUML are not working due to vitepress-plugin-mermaid bug
- Page layout is not optimized for multiple products
- Search is local frontend by default, should change to remote search like Algolia if there are lots of contents.